Particle Emitters
Creating Particle Emitters
To create a particle emitter in the editor, first select the Objects tab in the side panel. Choose the "Effects" object category, and set the object type to "Particle Emitter".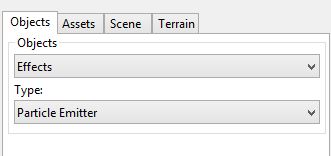
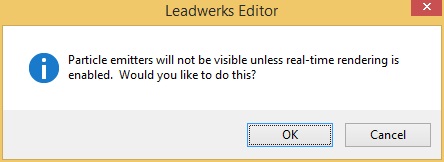
Click in the viewport where you want to create the particle emitter to place the point entity creation guide. Press the Enter key to create a new emitter. If the editor has real-time rendering disabled, a message box will appear asking if you would like to enable it. Press the OK button. This will make it so we can see the emitter running as we edit its properties.
Emitter Properties
When a particle emitter is selected, the properties editor will display an extra tab with a long list of properties that affect the appearance and behavior of the emitter.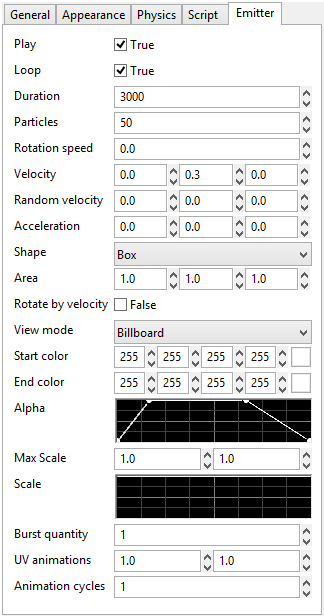
Let's briefly go over what each of these do:
- Play: Determines whether the emitter starts emitting once the game is started.
- Loop: determines whether the emitter keeps emitting particles or stops after the Particle amount has been reached.
- Duration: The lifetime of a particle.
- Particles: The amount of particles the emitter produces, devided over the duration.
- Rotation speed: The rotation of every particle along the axis.
- Velocity: The velocity applied to the particles that are emitted.
- Random velocity: a random velocity that affects the current velocity of the particle.
- Acceleration: The amount of acceleration a particle gets during its lifetime.
- Shape: The shape where the particle spawn in.
- Area: This defines the size of the shape.
- Rotate by velocity: When particles are rotated by velocity, it is assumed that the direction the particle is pointing is to the right. Rotate by velocity should be used anytime that particles need to face the direction that they are heading.
- View mode:
- Billboard
- Y-axis
- Face up
- Start color: The starting color of the particle emitter. Particles will smoothly transition from the start to end color over their lifetime.
- End color: The end color of the particle emitter.
- Alpha: This property allows you to change the alpha value of the particle during its lifetime. Click and drag on the nodes to move them, or click on the graph to add additional nodes.
- Max scale: The maximum scale a particle can have during its lifetime.
- Scale: This property allows you to change the scale value of the particle during its lifetime. Click and drag on the nodes to move them, or click on the graph to add additional nodes.
- Burst quantity: The amount of particles that are spawned in one iteration.
- UV animations: You can use this with a sprite sheet to make animated particles. This is a grid of animation frames, progressing from left to right, then top to bottom. The two values indicate the width and height of the grid, in frames.
- Animation cycles: The number of times to play the animation on each particle before it dies out.
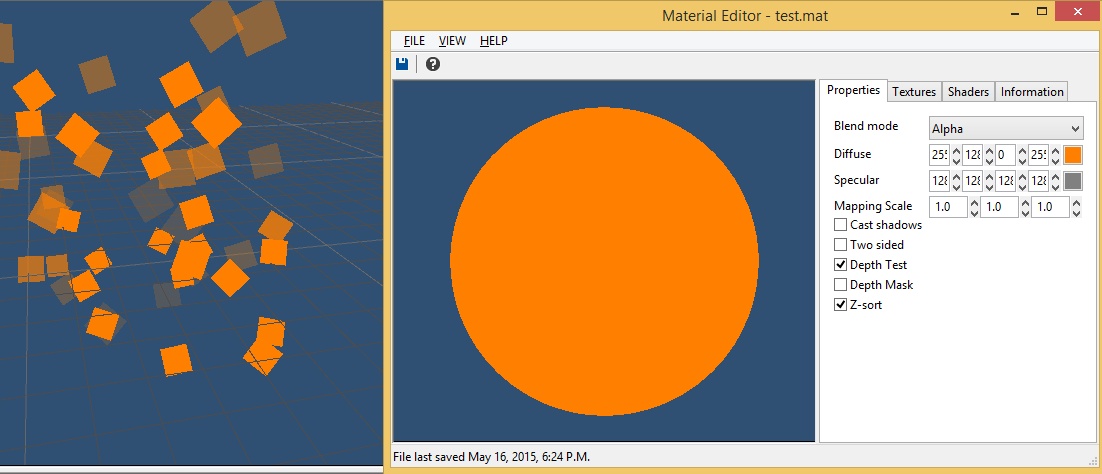
Particle Materials
Particle emitters use special materials with a few defining characteristics we'll go over now. You can change the material of an emitter in the Material property, under the Appearance tab in the properties panel.Emitter materials should have Z-sorting enabled so that they get rendered last, and are sorted by distance. If the material does not have z-sorting enabled, the emitter will not be visible. Materials should have depth mask disabled, so they don't add information to the depth buffer. Shadows should be disabled, as these objects will not cast shadows. Finally, the blend mode must be set to "Alpha" to make the particles fade out smoothly.To summarize that, emitter materials have the following characteristics:- Z-sorting must be enabled.
- Depth mask should be disabled.
- The blend mode should be set to "Alpha", "Shade", or "Light".