Script Properties
Exposing Properties
Script variables can be exposed to the editor by adding a comment after the variable declaration. The comment will indicate what type of value it is, and can include a name to display in the properties panel. Script properties are added at the top of the Lua script and have the following syntax:
Script.MyNumber = 1337 --int "My Number"You can specify the type of interface element you want to display in the properties panel. This is not strictly related to the data type, as some data types can use more than one interface element. For example, variables with the number data type can use both a drop-down list and an integer spinner.
Property Types
The available interface elements are available:
bool [label] - Displays a checkbox.
float [label] (a decimal number) - Displays a decimal number spinner.
int [label] (a whole number)- Displays an integer number spinner.
string [label] - Displays an editable text field.
vec2 [label] - Displays a two-dimensional number spinner.
vec3 [label] - Displays a three-dimensional number spinner.
vec4 [label] - Displays a four-dimensional number spinner.
pos [label] - Displays a three-dimensional number spinner using current grid units.
color [label] - Displays a color editor.
entity [label] - Displays a field that can accept another object in the scene.
path [label] [filter] - Displays a file path field.
choice [label] [choice0,choide1,choice2...] - Displays a drop-down list.  The value is converted to a number.
choiceedit [label] [choice0,choide1,choice2...] - Displays an editable drop-down list.  The value is converted to a string.
Now let's create a new script and add a property that appears in the properties panel. Select the Assets tab in the side panel, then navigate to the "Scripts\Object" folder in the asset browser. Right-click in the lower panel and select the New > Script popup menu item.
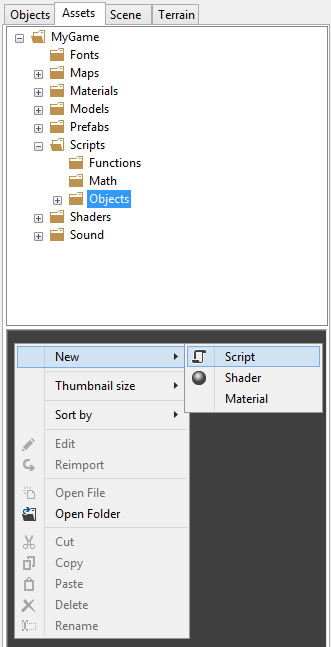 Name the new script "MyScript" and press the OK button.
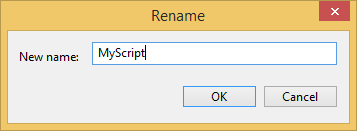 Double-click on the file thumbnail in the asset browser to open your new script in the script editor. Once again, we're going to make a script that turns an object a constant amount each frame. However, this time we'll make it so the rotation can be adjusted in the properties panel.Paste this code into the code editor and save the script:
function Script:UpdateWorld()Once again, select the File > Open menu item and choose the file "Object Scripts.map". Press the Open button to open this map. Remember this?:
self.entity:Turn(0,0,1)
end
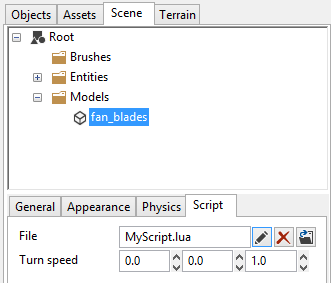
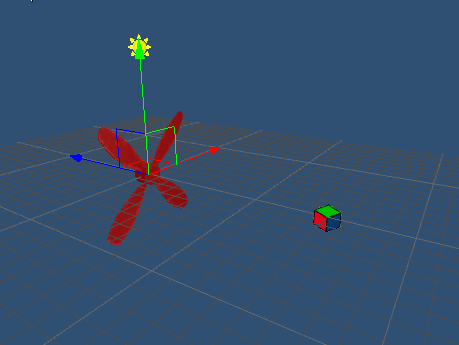 Select the fan model, then set the Script property in the properties panel to the "MyScript.lua" file you just saved.
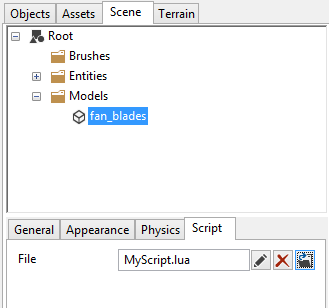 At this point you should be able to run the game by selecting the Game > Debug menu item in the main menu, and you'll see the fan spinning.Now let's make the rotation speed customizable. Replace the code in the script with this. A new "turnspeed" property is defined. The name that shows up in the editor will be "Turn speed".:
Script.turnspeed = Vec3(0,0,1)--Vec3 "Turn speed"function Script:UpdateWorld()Save the script, and the property will be immediately visible in the properties panel when the fan model is selected. Notice the default value defined in the script has already been set.
self.entity:Turn(self.turnspeed)
end
 If you run the game at this point, you should see the exact same behavior as before. Now try increasing the third component of the "Turn speed" property to 10.0 and run the game. The fan will now be spinning much faster, without any code changes.
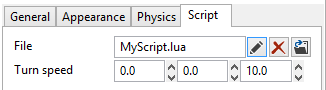 The exposed script property lets us modify the behavior of the script without changing any code. If you'd like to see what all the available property types look like, just paste the code below into your script and look at the properties panel:
Script.myText = "Default text" --string "Some text"When you save the script and look in the property panel you will see the following interface elements:
Script.myBool = true --bool "boolean"
Script.myFloat = 3.14 --float "Decimal"
Script.myInt = 1337 --int "Whole number"
Script.my2dVector = Vec2(10,20) --vec2 "2D Vector"
Script.my3dVector = Vec3(10,20,30) --vec3 "3D Vector"
Script.my4dVector = Vec4(10,20,30,40) --vec4 "4D Vector"
Script.myPos = pos(10,20,30,) --pos "Centimeters"
Script.my4Color = Vec4(10,20,30,40) --color "Color picker"
Script.myPath = "" --path "File location" "Texture File (*tex):tex|Texture"
Script.myChoice = 1 --choice "Choice list" "Monster, Zombie, Alien"
Script.myEditChoice = "Monster" --choiceedit "Choice list" "Monster, Zombie, Alien"
Script.myEntity = nil --entity "Some entity"function Script:Start()
System:Print("Text: " .. self.myText)
System:Print("Bool: " .. self.myBool)
System:Print("Float: " .. self.myFloat)
System:Print("Int: " .. self.myInt)
System:Print("2d Vector: " .. self.my2dVector)
System:Print("3d Vector: " .. self.my3dVector)
System:Print("4d Vector: " .. self.my4dVector)
System:Print("Posisiton in CM: " .. self.myPos)
System:Print("Color: " .. self.myColor)
System:Print("Select filepath: " .. self.myPath)
System:Print("Dropdown choice: " .. self.myChoice)
System:Print("Edit choice: " .. self.myEditChoice)
if entity~=nil then
System:Print("Selected entity: " .. self.myEntity:GetKeyValue("Name"))
end
end

Conclusion
By now your mind is probably brimming with ideas of all the cool ways we can use this system to make games. We just have to cover a few more details, and then it's on to the gameplay.