

 SCP
SCP

Entry posted by burgelkat
2,781 views
Hi ,
Currently I'm planning the next level for Behind Enemy Lines. Since the player has to do part of the level with a sniper rifle, a little preliminary work had to be done. So, Here's my way to tackle this topic with the Addon "FPS Weapon Pack":
The tutorial from tipforeveryone was very helpful to me. You can find it here
https://www.leadwerks.com/community/blogs/entry/1775-realistic-sniper-rifle-scope-in-lua/
i downloaded a Scope frome here :http://www.cadnav.com/3d-models/model-36647.html
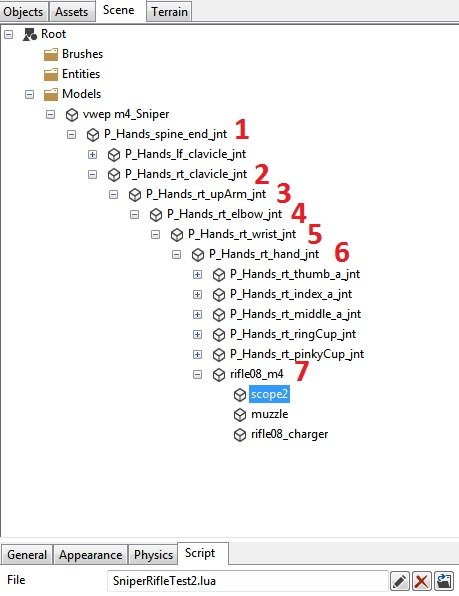
and put it as a child to the "vwep m4" and saved it as a prefab "vwep m4_sniper"
it should be look like this

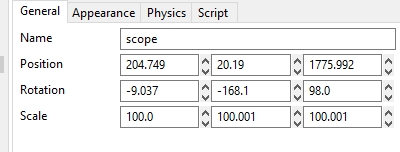
Now you have to ajust the scope
But for the scope script to work, an empty script must be inserted in the following places. Thanks to Macklebee for this hint!
Now you have to change 2 scripts
1. fpsgun.lua
2. fpsplayer.lua
1. fpsgun.lua
this script i saved under "FPSGun_Sniper.lua"
then this video helps a lot :https://www.youtube.com/watch?time_continue=628&v=3OqwQSP-2FU
thanks to BluHornet
place this in your fpsgun_sniper.lua
Script.offsetNor=Vec3(0,0,0)
Script.offsetADS=Vec3(0,0,0)--Vec3 "Offset ADS"
the next line put after the function Script:Start()
self.offsetNor = self.offset
self.hasZoom=true
self.hasZoom=true (or false) has been inserted because the ironsight will be active in every weapon, but at Grenade or something else i did not want this.
Since I have difficulty with the sway of the weapon and I have no solution for it currently, I commented under function Script: Draw () the following lines out:
	--self.swayspeed = Math:Curve(speed,self.swayspeed,20)
	--self.swayspeed = math.max(0.5,self.swayspeed)
	--self.amplitude = math.max(2,Math:Curve(speed,self.amplitude,20))
now its time to change the fpsplayer.lua
2. fpsplayer.lua
this line put in at the beginning
Script.ADSmode=false
next place the following lines under the function Script:UpdateWorld()
	if self.weapons[self.currentweaponindex]~=nil and self.weapons[self.currentweaponindex].hasZoom then
		if self.ADSmode == false then
			self.camera:SetFOV(70)
			self.weapons[self.currentweaponindex ].offset = self.weapons[self.currentweaponindex ].offsetNor
		end
		if self.ADSmode == true then
			self.camera:SetFOV(20)
			self.weapons[self.currentweaponindex ].offset = self.weapons[self.currentweaponindex ].offsetADS
			end
	end
and this also in this function (i put this after a lince called "--fire weapon"
	if window:MouseHit(2) then
		if self.weapons[self.currentweaponindex]~= nil then
			if self.ADSmode == false then
				self.ADSmode=true
			else
				self.ADSmode=false
			end
		if self.sound.pickupweapon~=nil then self.sound.pickupweapon:Play() end
	end
	end
if you do not want the ironsight by jump, reload, or carry an item, then paste those lines at the right places
self.ADSmode=false
Since the original crosshair disturbs me in the ironsight, I have inserted "and self.ADSmode==false then" in the function Script:PostRender(context) it should looks like this
	if self.health>0 then
		if self.canUse==true and self.carryingEntity == nil then
			local pickUpX = math.floor((context:GetWidth() - self.image.hand:GetWidth()))/2
			local pickUpY = math.floor((context:GetHeight() - self.image.hand:GetHeight()))/2
			context:SetBlendMode(Blend.Alpha)
			context:DrawImage(self.image.hand, pickUpX, pickUpY)
		else
			if self.carryingEntity==nil then
				if self.weapons[self.currentweaponindex]~=nil then
					if self.image.crosshair and self.ADSmode==false then
						local crossHairX = math.floor((context:GetWidth() - self.image.crosshair:GetWidth()))/2
						local crossHairY = math.floor((context:GetHeight() - self.image.crosshair:GetHeight()))/2
						context:SetBlendMode(Blend.Alpha)
						context:DrawImage(self.image.crosshair, crossHairX, crossHairY)
					end
				end
			end
		end
What follows now are the individual settings for each weapon to get an Ironsight.
M4 Sniper:
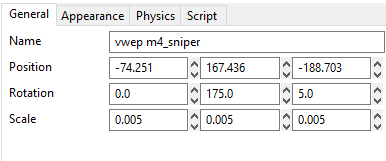
in the script:


the sniper M4 looks now like this


the m4 without scope
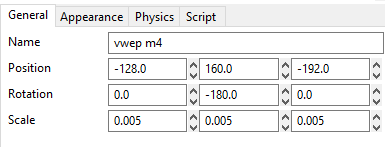
in the script:


it should look like this


the shotgun
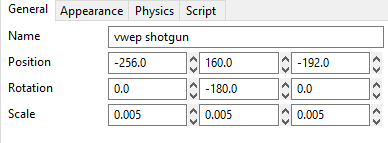
in the script


the shotgun look like this

the pistol
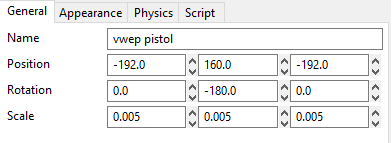
in the script


the pistol look now like this

So, that was my solution. But if you have even better settings, feel free to write in this blog. I hope that this blog helped a bit. Especially to save time to find the settings for the Ironsight.
Have fun.
Greetings burgelkat
-
 4
4

0 Comments
Recommended Comments
There are no comments to display.