

 SCP
SCP
Entry posted by tipforeveryone
6,122 views
This tutorial will help you to make something like this

Step 1: Prepare scope model
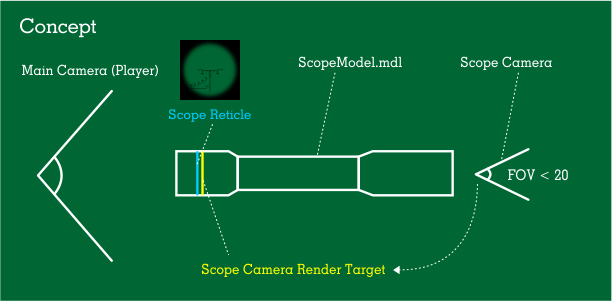
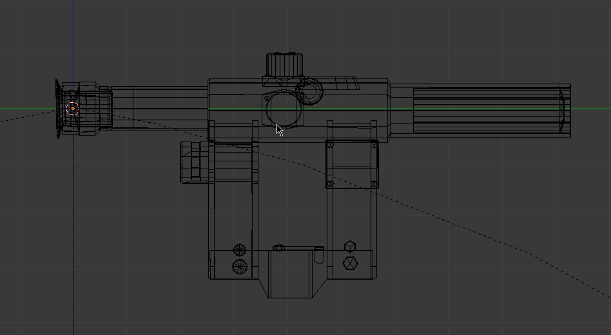
In 3D application, import your 3d scope model and adjust its pivot point. Make sure the pivot's position looks like image below. This step is extreme important! The position of pivot point is the position of Scope Camera Render Target
If you use Blender, press Ctrl + A > Location / Scale / Rotation to reposition scope's pivot
Example model file attached at the bottom of this entry


Export this scope model to FBX in Leadwerks
Step 2: Build scope's components
According to above concept, we have 3 main components: Scope Camera, Scope Model, Scope Camera Render Target. We will create them, one by one using LUA
First, import Scope Model to the scene > create a new Script > rename it to "Scope.lua" > apply script to Scope Model.
Here is the code
Script.scopePhysicalLength = 1
--This is actually the distance from Scope Camera to Scope Camera Render Target
Script.scopeResolution = 512
--Scope render resolution, higer = better look = performance cost, 256 is fine
Script.scopeFOV = 4

function Script:Start()
--Create Scope Camera Render Target (SCRT) first
self.scopeTexture = Texture:Create(self.scopeResolution,self.scopeResolution)
self.scopeMaterial = Material:Create()
self.scopeMaterial:SetShader("Shaders/Model/Diffuse.shader")
self.scopeMaterial:SetColor(1,1,1,1)
self.scopeMaterial:SetSortMode(true)
--"SortMode = true" will eliminate the unwanted black shade in SCRT when render
self.scopeMaterial:SetTexture(self.scopeTexture)

self.scopeRenderTarget = Model:Cylinder(32)
self.scopeRenderTarget:SetParent(self.entity)
self.scopeRenderTarget:SetPosition(0,0,0)
self.scopeRenderTarget:SetRotation(0,0,0)
self.scopeRenderTarget:SetScale(0.065,0,0.065)
--X and Z axis of scale should be adjusted to make sure SCRT is fit inside Scope Model
self.scopeRenderTarget:SetMaterial(self.scopeMaterial)

--Create Scope Camera
self.scopeCamera = Camera:Create()
self.scopeCamera:SetParent(self.entity)
self.scopeCamera:SetPosition(0,self.scopePhysicalLength,0)
self.scopeCamera:SetRotation(-90,0,0)
self.scopeCamera:SetClearColor(1,1,1)
self.scopeCamera:SetFOV(self.scopeFOV)
--this FOV value should be smaller than 20 to make the zoom effect
self.scopeCamera:SetRenderTarget(self.scopeTexture)

--Create Scope Reticle
self.scopeReticle = Model:Cylinder(32)
self.scopeReticle:SetParent(self.entity)
self.scopeReticle:SetPosition(0,-0.001,0) --make sure Reticle stays between main camera and CSRT
self.scopeReticle:SetRotation(0,0,0)
self.scopeReticle:SetScale(0.065,0,0.065)
--This reticle should be the same size as SCRT
local mtl = Material:Load("Materials/reticle.mat")
self.scopeReticle:SetMaterial(mtl)
end
Step 3: Check the resuilt
It should look like this


Small tutorial: How to create your own reticle texture
- Step 1: Use Photoshop or Gimp to create a PNG image of a reticle, it should look like this

- Step 2: Save this file to Leadwerks Project Assets Folder (ie: Materials/reticle.png) it will be converted to reticle.tex automatically
- Step 3: In Leadwerks, right click reticle.tex > Generate Material then config this material like image below

That is how you got your own scope reticle 
*Tip: You can attach Scope Model to a Weapon Model and combine with iron sight feature in my previous tutorial
-
 8
8

3 Comments
Recommended Comments